
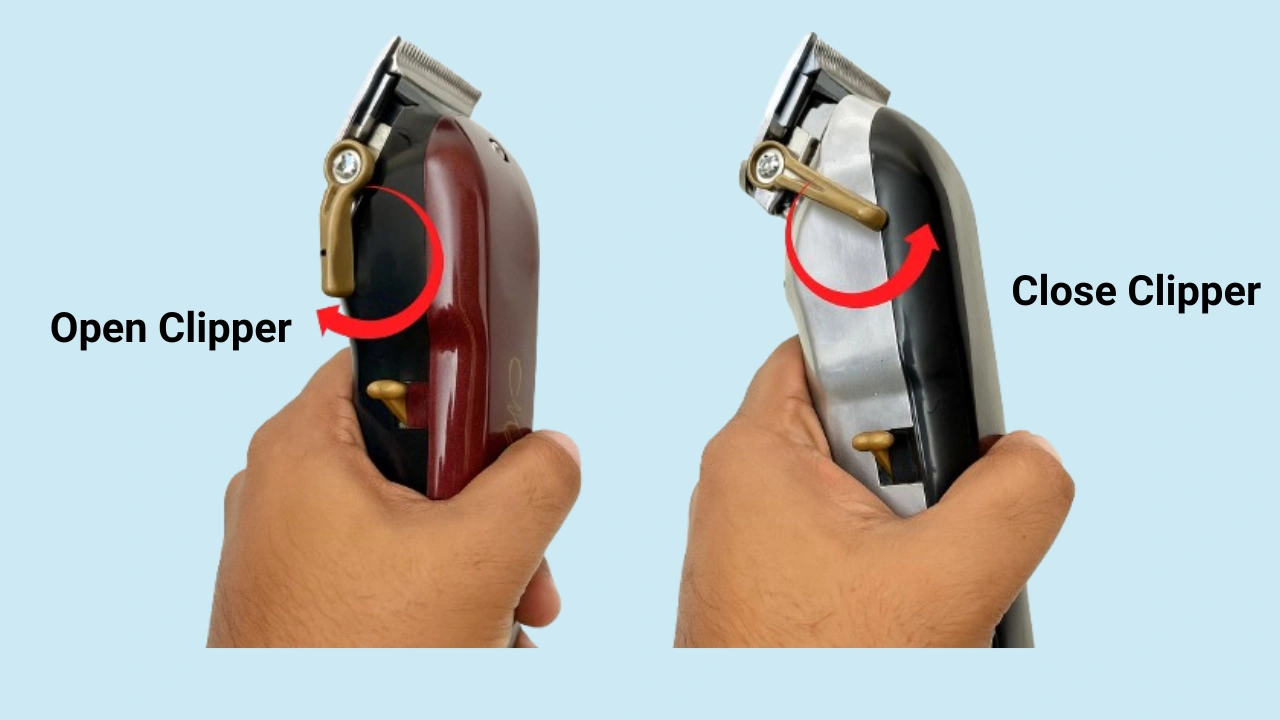
Open clippers leave hair longer and are best for bulk removal and soft blending. Closed clippers cut shorter and tighter — ideal for sharp fades, outlines, and detail work. Most professional haircuts use both settings in sequence. Keep reading to know exactly when and how to switch.
I’ve watched guys ruin a perfectly good fade because they didn’t understand one small lever. It’s one of those things that looks simple but makes a massive difference — the open vs closed clipper debate that every barber knows and every beginner overlooks.
Whether you’re cutting your own hair at home in the US or just trying to understand what your barber is doing, this guide will walk you through everything you need to know. Not just the theory — but the real technique, the order of operations, and the mistakes that cost people clean fades every single day.
What Does Open vs Closed Actually Mean?
On most clippers — Wahl, Andis, BaByliss, Oster — there’s a lever on the side of the blade. That lever is the most underused tool in most people’s kits.
- Open position (lever pushed down): The top blade slides away from the bottom blade, widening the gap. This results in less aggressive cutting, leaving hair a bit longer.
- Closed position (lever pushed up): The blades move closer together, tightening the cutting gap. This cuts shorter, closer, and cleaner.
Neither position is better than the other. They serve completely different purposes — and understanding clipper lever settings is what separates a clean cut from a choppy one.
Here’s the key insight most articles miss: the lever isn’t just two positions. It’s a range. You can move it to half-open, three-quarters closed — anywhere in between. That middle range is where blending magic actually happens.
Open Clippers: When and Why to Use Them
Think of the open setting as your roughing tool. It’s where every good haircut starts.
When the blade is open, it sits slightly higher off the scalp and lifts hair before cutting. This means it takes off less per pass — which sounds like a downside, but it’s actually exactly what you want when you’re removing bulk or setting up a fade.
Best Uses for Open Clippers
- Bulk removal: Starting a haircut with open clippers on a longer guard (like a #4 or #3) takes off length fast without over-committing.
- Soft blending: The longer cut creates a gentler transition between guard lengths — critical for any fade or blend.
- First passes with a guard: Open clippers help guards glide through thick hair more smoothly, reducing snagging and lines.
- Sensitive scalps: If someone has scalp sensitivity or thin skin, open clippers are gentler on the first pass.
Advantages and Limitations of Open Clippers
✅ Pros of Open Setting
- Safer starting point — harder to over-cut
- Creates natural, soft transitions between lengths
- Reduces bulk quickly on thick hair
- Guards glide more smoothly through dense hair
- Gentler on sensitive skin and scalps
- Ideal for home beginners learning to fade
❌ Cons of Open Setting
- Can’t produce sharp, defined lines
- Not suitable for outlining or detail work
- May leave a slightly rough or uneven finish
- Requires follow-up with closed setting to complete the look
- Less effective on very fine or thin hair
Closed Clippers: When and Why to Use Them
If open clippers are your roughing tool, closed clippers are your finishing tool. This is where you take a decent haircut and turn it into a clean one.
With the blade fully closed, the cutting edge is tighter to the scalp. You’re cutting shorter, with more precision. Every barber finishes with closed clippers — whether they’re edging a hairline, locking in the bottom of a fade, or creating the crisp outline that makes a beard look intentional.
Best Uses for Closed Clippers
- Sharp hairline edges: Closed clippers on a T-liner or zero-gap clipper create that clean, defined edge around the forehead and temples.
- Fade finishes: After rough blending with open clippers, closed clippers lock in the tight graduation at the bottom of a taper fade haircut.
- Beard shaping: Closed clippers on a low guard or no guard create the sharp lines that define beard edges.
- Neckline cleanup: Nothing looks more polished than a clean neckline — you need closed clippers to get it right.
- Zero-gap cutting: When the lever is fully closed and blades are adjusted flush, you get the closest cut possible without a razor.
✅ Pros of Closed Setting
- Razor-sharp lines and outlines
- Perfect for tight fades and low skin fades
- Creates the final polished look of any cut
- Essential for beard and mustache shaping
- Great for detail work around the ears
- More precise on fine or thinning hair
❌ Cons of Closed Setting
- More risk of irritation on sensitive skin
- Slower for removing bulk on thick hair
- Lines can look harsh if not blended first
- Requires steady hands and practice
- Can cause razor bumps near the neckline if misused
Quick-Reference Comparison Table
| Situation | Best Setting | Why |
| Starting a haircut on thick hair | Open | Takes bulk off faster, guards glide better |
| Creating a soft fade blend | Open | Leaves hair slightly longer for a natural gradient |
| Finishing a taper fade haircut | Closed | Locks in the tight, clean bottom of the fade |
| Edging a hairline | Closed | Maximum precision for defined outlines |
| Shaping a beard | Closed | Sharp lines needed for clean beard edges |
| Blending between guard lengths | Half-Open | Mid-position smooths transitions invisibly |
| Sensitive scalp / first-time cut | Open | Less aggressive, gentler on skin |
| Cleaning up a neckline | Closed | Needs tight, crisp definition to look polished |
How to Combine Open and Closed Clippers Like a Pro
Here’s the thing: professional barbers don’t think of open vs closed as a choice. They flow between the two — sometimes mid-stroke — to build seamless fades that look effortless. This is the core of what makes hair fading techniques work.
Here’s the order of operations used in most American barbershops to execute a clean fade:
1 Open clippers + high guard (e.g., #4 or #3) — top of the head
Start open to take off length and reduce bulk. Work from the top down in fluid strokes. This sets the length for the whole cut.
2 Open clippers + lower guard (e.g., #2 or #1.5) — mid-section
Still open. You’re establishing where the fade will live. The open setting ensures a soft line between guard lengths — no harsh shelf.
3 Half-open lever — blending zone
Move the lever to the middle position and work the transition area with a scooping motion. This is the invisible blend that separates clean fades from choppy ones.
4 Closed clippers + low guard or no guard — bottom of the fade
Now you close the lever. Work the bottom section tight. If you’re doing a skin fade, this is where you get close to the scalp for that zero-gap finish.
5 Closed clippers — outline and edges
Finish with your T-liner or outliner on fully closed. Edge the hairline, clean up around the ears, and sharpen the neckline. This is what makes the cut look deliberate.
💡 Pro Tips for Cleaner Results
- Always work in the same direction as hair growth on the first pass. Go against it only when cleaning up.
- Let the clipper do the work — pushing too hard actually reduces cutting efficiency and increases skin irritation.
- If you’re unsure, stay open longer. You can always go tighter; you can’t add hair back.
- Clean and oil your blades before every session. Even brand-new blades cut noticeably better after oiling.
- Use a hand mirror or your phone camera to check the back — what you feel isn’t always what’s there.
- The half-open “sweet spot” varies by clipper brand. Spend 10 minutes before a haircut getting familiar with your specific model’s lever response.
Choosing the Right Clipper Lever Settings for Your Skill Level
Not everyone cutting hair is a barbershop pro. Most Americans cutting their own hair at home are working with a decent set of Wahl Seniors or Andis Masters and learning as they go. Here’s how to approach clipper lever settings based on where you are in your journey.
If You’re a Beginner
Live in the open setting. Seriously. Use a guard, use open clippers, and go slowly. The biggest beginner mistake is rushing to closed clippers too fast — you end up with harsh lines and no way to fix them. Build your confidence with open blending, then introduce closed clippers only for the neckline and edge cleanup.
If You’re Intermediate
Start experimenting with the half-open position. This is where most home haircuts level up. Once you can control blending between guard lengths with a half-open lever, your fades will start looking smooth instead of stepped.
If You’re Advanced
You’re probably already doing this intuitively. Focus on using the lever mid-stroke — pulling it from half-open to closed as you flick off the hair at the top of a stroke. This “lever fade” technique is what separates barbers who cut well from those who cut clean.
Open vs Closed Clippers for a Taper Fade Haircut
The taper fade haircut is one of the most requested cuts in American barbershops right now — from the classic high-and-tight to the modern low skin fade. And it lives or dies on lever control.
Here’s why: a taper fade requires a smooth, invisible gradient from one length to another. If you cut everything on closed, you get harsh steps. If you cut everything on open, the fade is too soft and loses definition. The magic is in using open clippers to establish the blend and closed clippers to lock in the bottom — exactly the workflow described above.
For a low taper fade specifically, the closed setting is critical at the bottom two inches of the cut. That’s where the skin fade meets the hairline, and precision is everything. Any roughness here shows immediately in natural light.
Final Takeaway
Open and closed clippers aren’t competing tools — they’re two phases of the same process. Open clippers are where every great haircut starts: bulk removal, soft blending, and that rough-in of the fade. Closed clippers are where great haircuts finish: sharp edges, tight fades, and the clean outlines that make a cut look intentional.
Master the full range — open, half-open, and closed — and your results will improve immediately. The lever is small, but it’s one of the most powerful things on your clipper. Use it that way.